ERP Compatibility
Visual® Enterprise 6.4.1 and up SQL Server Logicity Pro 1.6 or 1.7 (5 licenses included)Pricing
Please contact us for pricingDisclaimer
VISUAL is a registered trademark of Infor.Logicity™ Automatic Invoicing
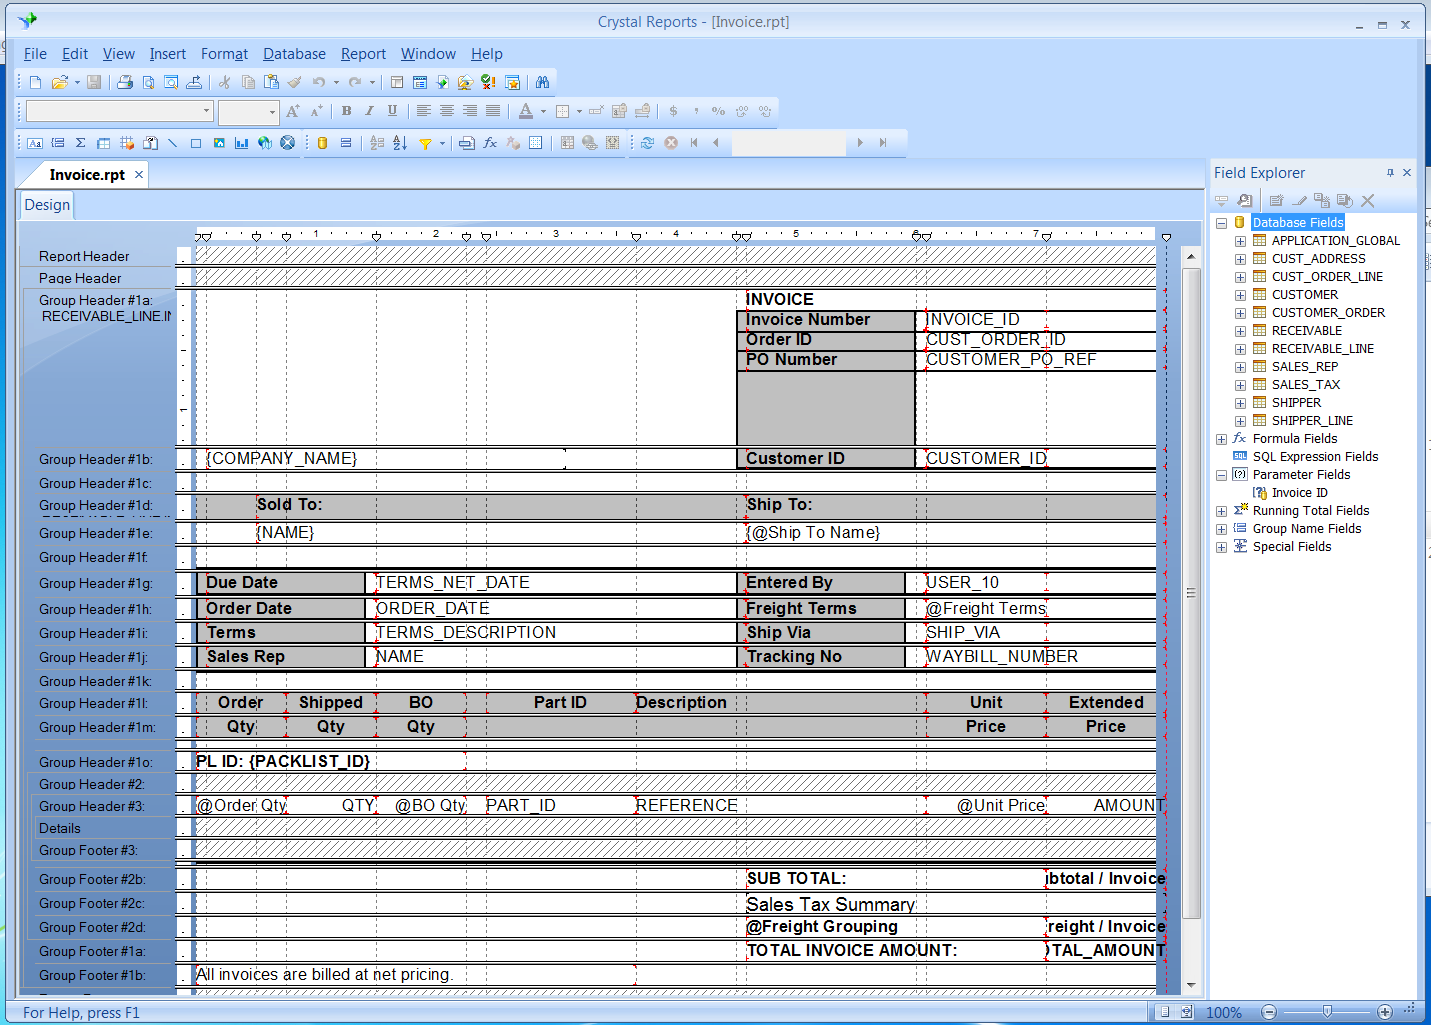
Logicity™ Automatic Invoicing is an application is built on top of the Logicity™ package (www.logicitysuite.com) and is used to automatically generate e-mailed or printed invoices out of Infor VISUAL® Manufacturing ERP / Infor 10 ERP Express. Simply define the customers you wish to have invoices automatically delivered, specify the way they wish to have the invoices delivered (e-mail, print) and the format (PDF, Excel, Word, etc.). Any time an invoice is created in VISUAL® for this customer the invoice will automatically be delivered according to the customer’s preferences.
Description
Video Demo
Setup Requirements
There will need to be an initial effort to establish the list of contacts which will receive e-mailed invoices.
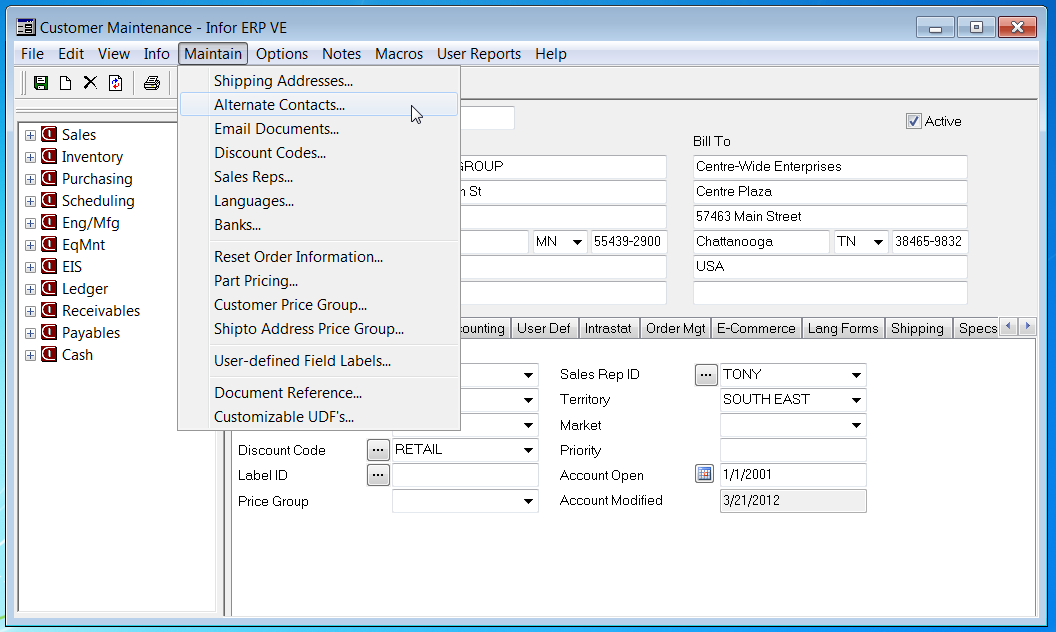
First off you’ll need to review the list of contacts per customer through the “Alternate Contacts” menu item and update e-mail addresses if missing or incorrect.
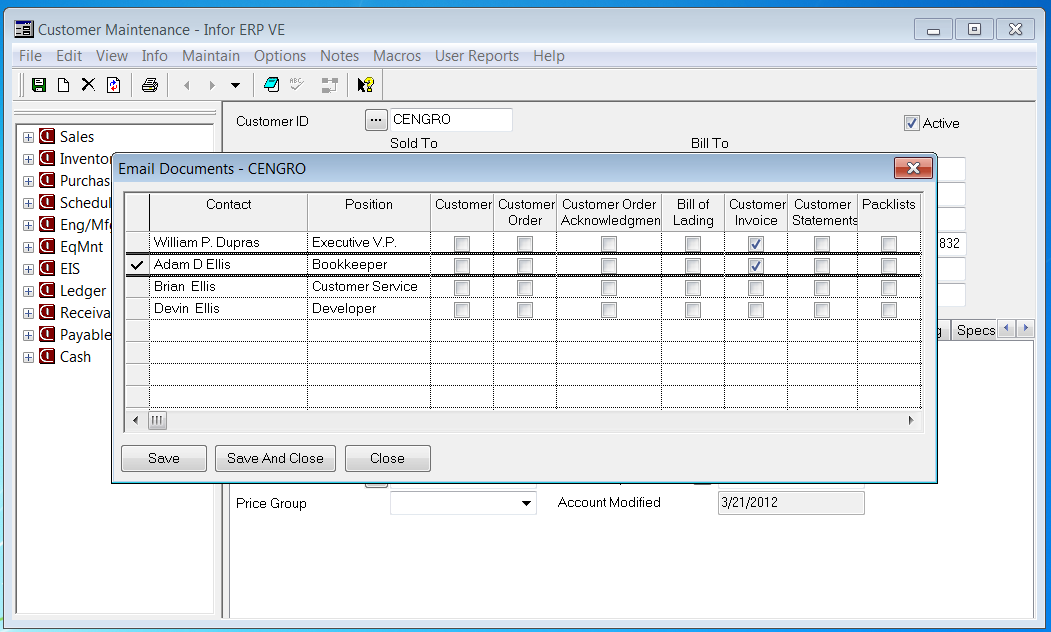
Secondly you’ll need to establish which contacts are to receive invoices through this new tool. This is accomplished through the “Email Documents” menu item.
Note the column for “Customer Invoice”. Those contacts which have this checkbox set will be the ones to receive a copy of the invoice as a result of processing through the new tool.
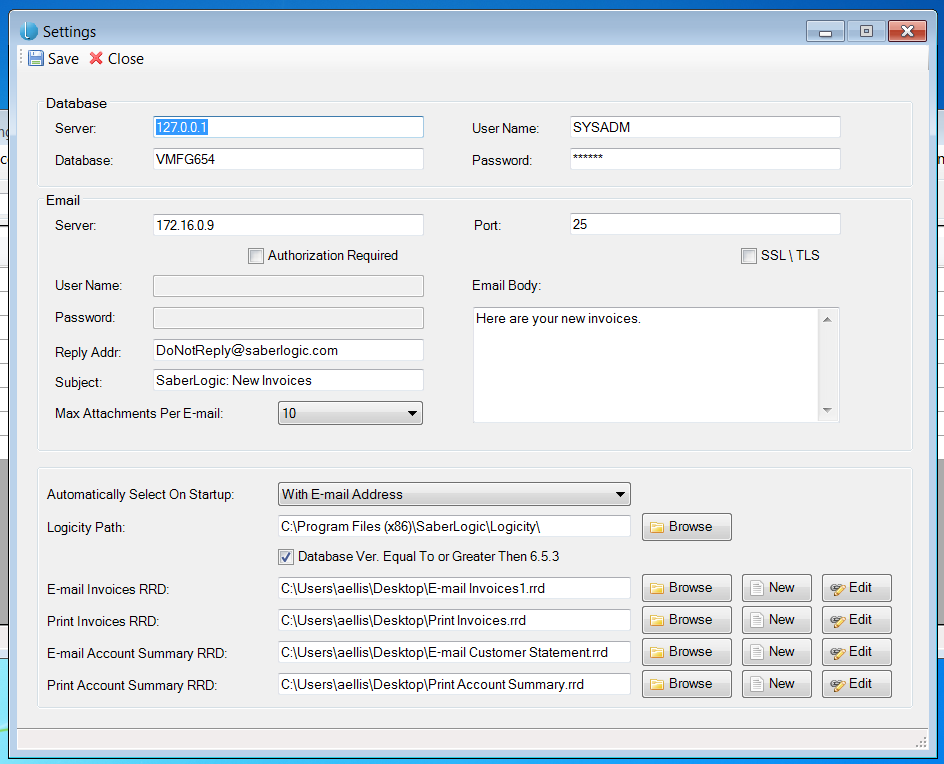
There are also some settings for the new tool which need to be established. This is done from the “Logicity Automatic Invoicing” UI panel by invoking the “Settings” option.
- Database information:
- Server IP address
- Database name
- Userid and PW for accessing the database
- E-mail specific information:
- Server IP address
- Port to access the E-mail server
- IF there is authentication required for network access
- Check “Authentication Required” checkbox
- Fill in the Userid and PW for Authentication
- IF your e-mail server requires SSL you’ll need to check the box
- The Reply address to appear with the e-mail
- The Subject line to appear on the e-mail
- The standard message you would like to appear within the e-mail body
- The maximum number of attachments (invoices) to include within a given e-mail
- This is needed to stay within a “reasonable” e-mail limit to prevent server rejection based upon overall size.
- Default handling settings:
- Automatic Setting on Startup dictates how you want the “Accept” to default upon first accessing the custom solution. The options are:
- None -> nothing will be automatically “Accepted”
- With E-mail Address -> Only entries with an associated e-mail
- Without E-mail Address -> Only entries with no associated e-mail address list
- All -> Everything is “Accepted”
- Logicity Path where the software can be located.
- This solution requires that the Logicity product be installed.
- Contact Saberlogic for information on licensing the Logicity product.
- Database Version > or = 6.5.3
- There are some setup differences with earlier versions of the Infor® ERP database which need to be accommodated within the solution.
- RRD file locations
- The RRD file extension is a format specific to the Logicity software product.
- The RRD files are built through use of the “Logicity Solution Builder Wizard”.
- Reference the demo for specifics on how to use this wizard.
- Automatic Setting on Startup dictates how you want the “Accept” to default upon first accessing the custom solution. The options are:
- These are the files which contain the execution logic associated to the processing buttons within the solution set.
- E-mail Invoices -> the “E-mail Invoices” button
- Print Invoices -> the “Print Invoices” button
- E-mail Account Summary -> the “Process Account Summary” > “E-mail Account Summary” button sequence
- Print Account Summary -> the “Process Account Summary” > “Print Account Summary” button sequence
Invoice Creation
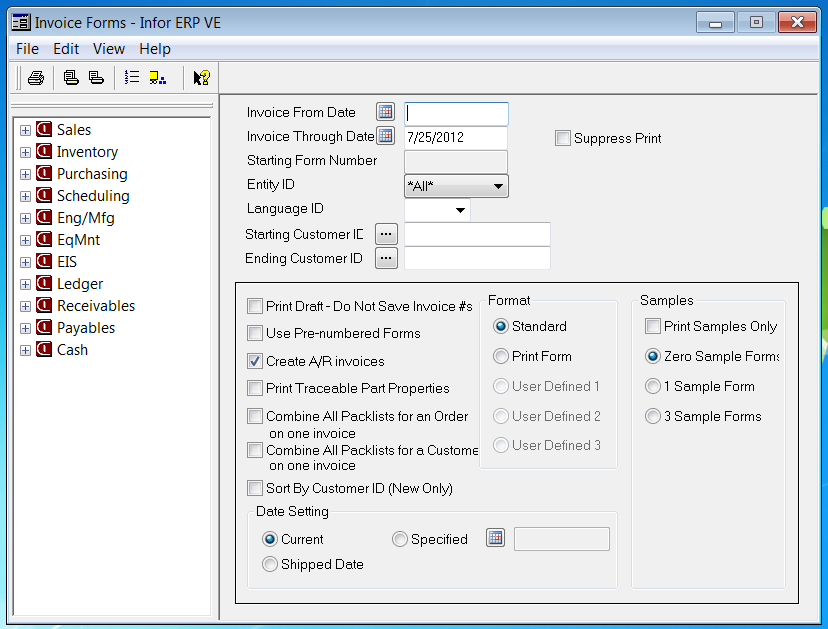
You’ll continue to create invoices per standard Infor® ERP.
Items to note:
- A deviation from your current process may involve checking the “Suppress Print” checkbox. However, you may wish to continue to print the invoice to visually review the document for accuracy prior to publishing through the new Invoicing workbench.
- You MUST check the box for”Create A/R invoices”. If you do not create the invoice it will not appear in the new UI panel for automated processing.
Invoice Selection and processing
You have the option of establishing a new menu item within Infor® ERP or you may decide to run this off of the start menu instead.
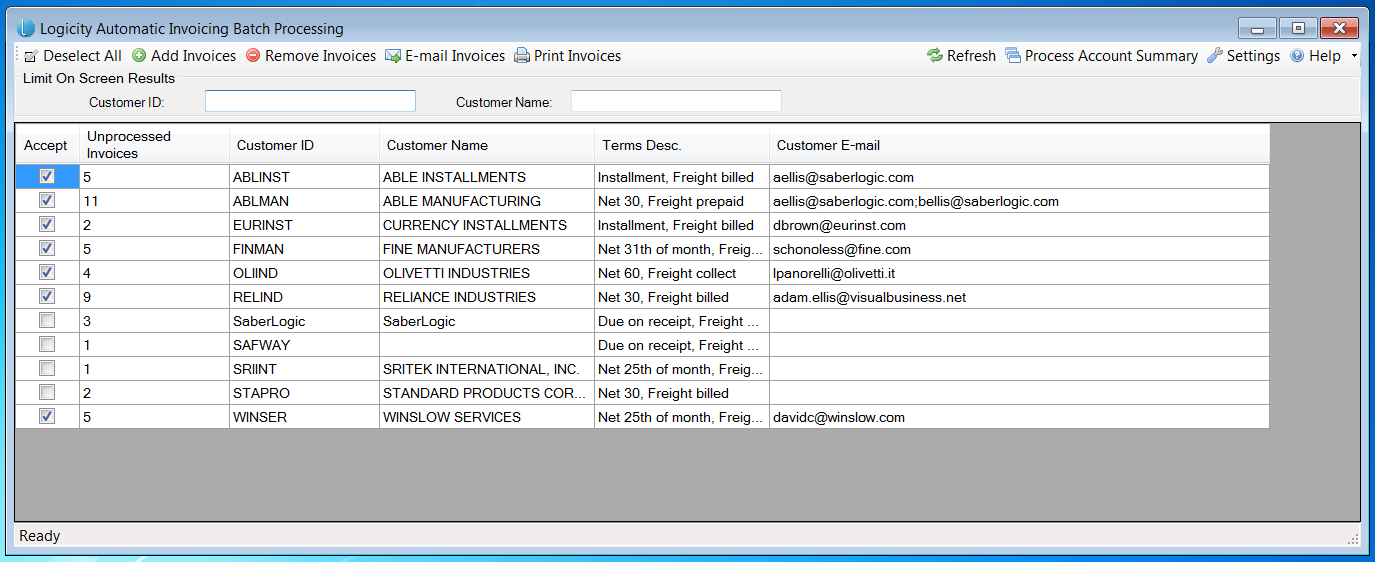
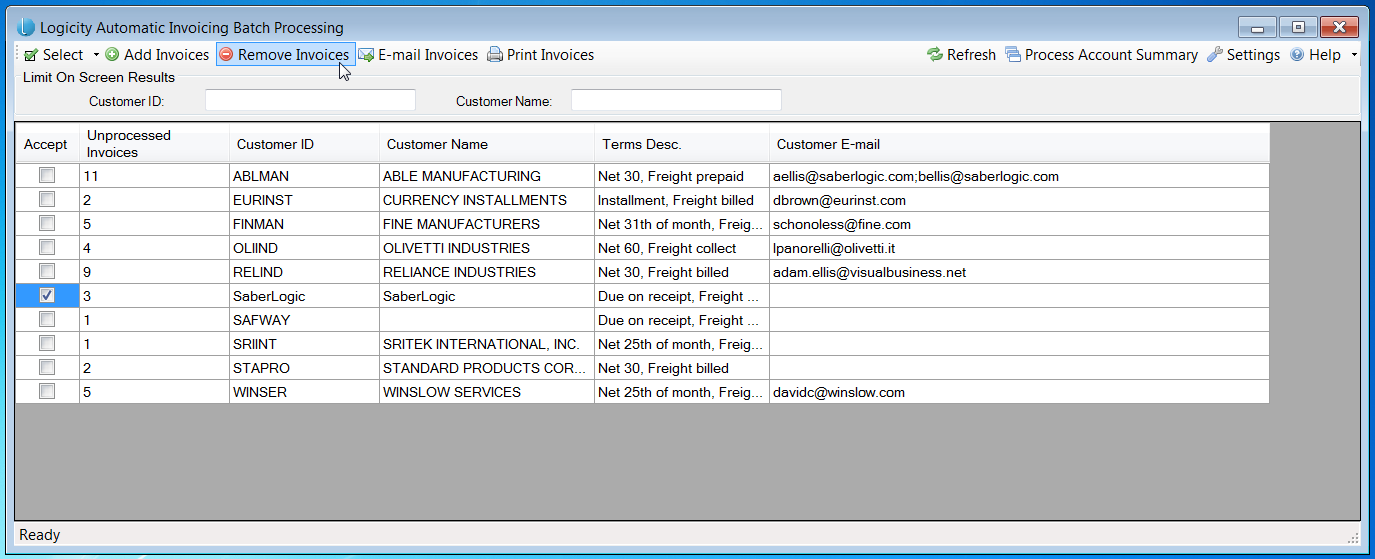
Upon invoking this new tool you’ll be presented with the following UI:
You’ll note the following:
- The UI loads with all unpublished Invoices.
- The status is determined from a new UD (user defined) table which is needed for this customization to keep track of what has and has not been published through this new process.
- The “Accept” column is defaulted with a check for those invoices where there is an e-mail address for the customer contact.
- There can be multiple e-mail addresses listed (separated by a semicolon) per invoice.
- The e-mail addresses are compiled from the list of “Alternate Contacts” associated to the Customer (see setup paragraph above).
- Each customer is summarized as far as the number of invoices to be published.
- All invoices for the customer will be handled the same and sent to all contacts listed under the e-mail address column.
- You can further restrict the list through entry of a customer id or customer name filter.
- This is a “contains” filtering so if you entered say “as” in the customer id field you would pare down the list in the grid to only those customer id’s which have “as” somewhere in their id.
- You have the option to remove the checked “Accept” column through the “Deselect” option at the top.
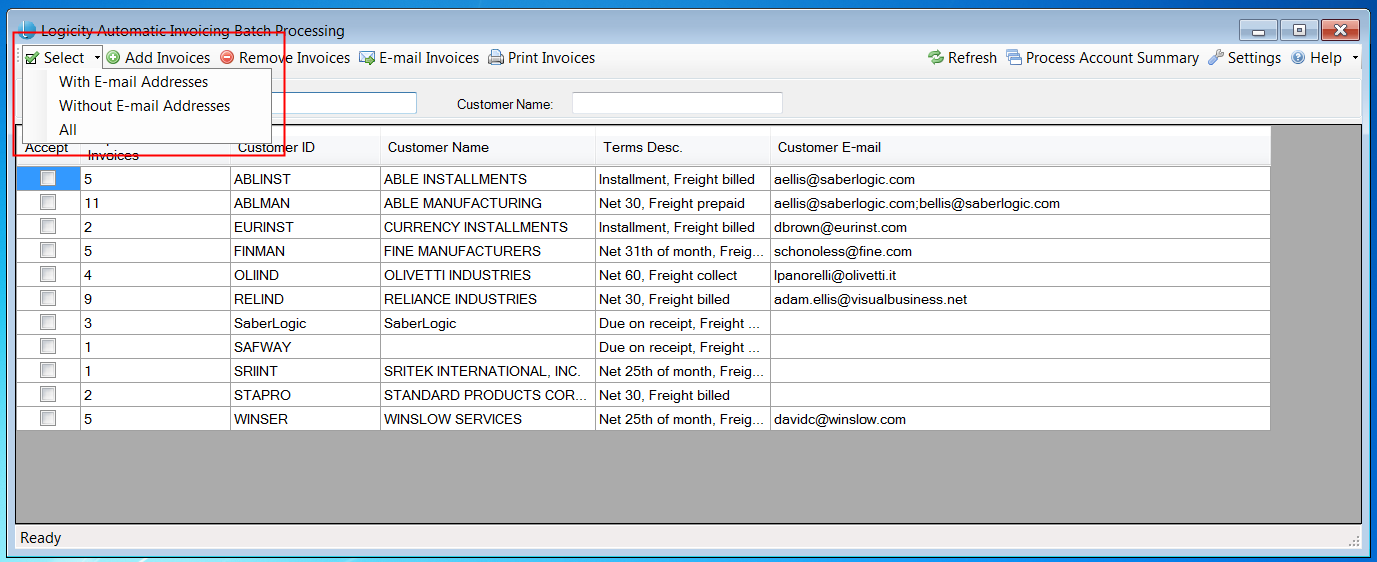
- When no selections are present in the “Accept” column this becomes the reverse (Select) with a dropdown list of three ways to automatically check entries in the “Accept” column:
- Those entries with at least one e-mail address
- Those entries with no e-mail address (printed and mailed invoices) or
- All entries
- When no selections are present in the “Accept” column this becomes the reverse (Select) with a dropdown list of three ways to automatically check entries in the “Accept” column:
- There are processing triggers for “E-mail invoices” and “Print invoices”
- This solution works best as a multi-pass solution.
- One pass processes invoices which have e-mail addresses.
- A second pass prints off invoices for slipping into envelopes and dropping into the mail.
- This solution works best as a multi-pass solution.
When satisfied with the list of selections for processing (Accepted) you then click on the appropriate action trigger (in the case of the example e-mailing the invoice).
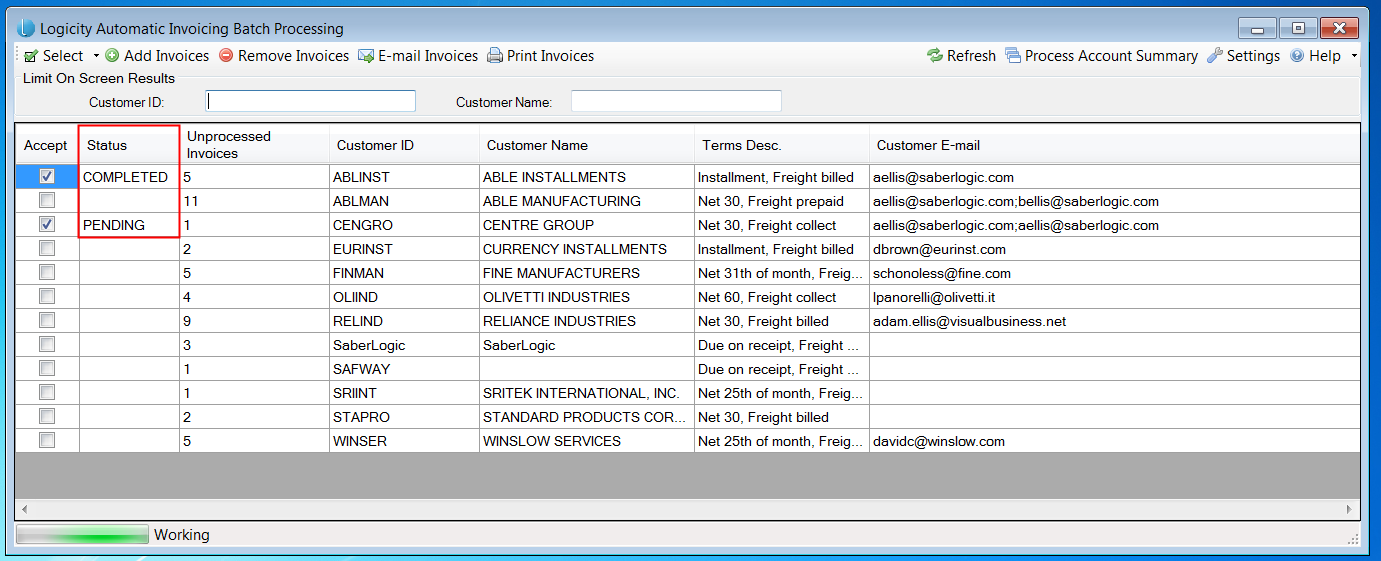
Note that a new column appears with the processing status. Initially everything “Accepted” will list as “Pending” and as each item successively processes the status changes to “Completed”.
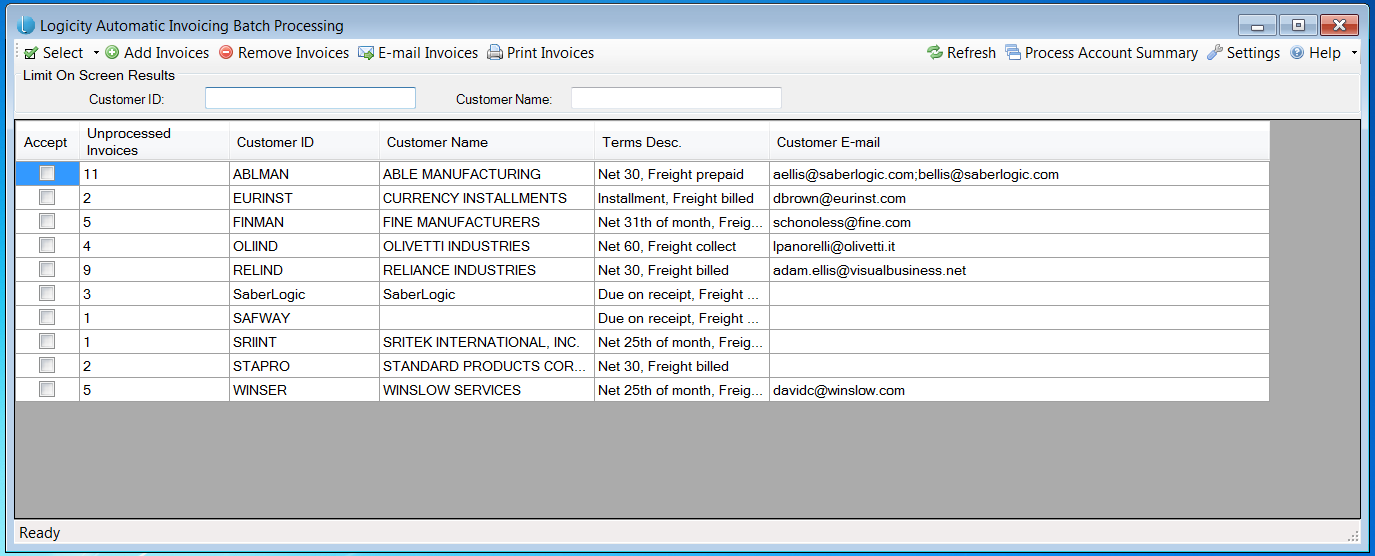
When all processing is completed the “Status” column disappears and all of the processed entries are removed from the list.
The results of processing the selected invoices are:
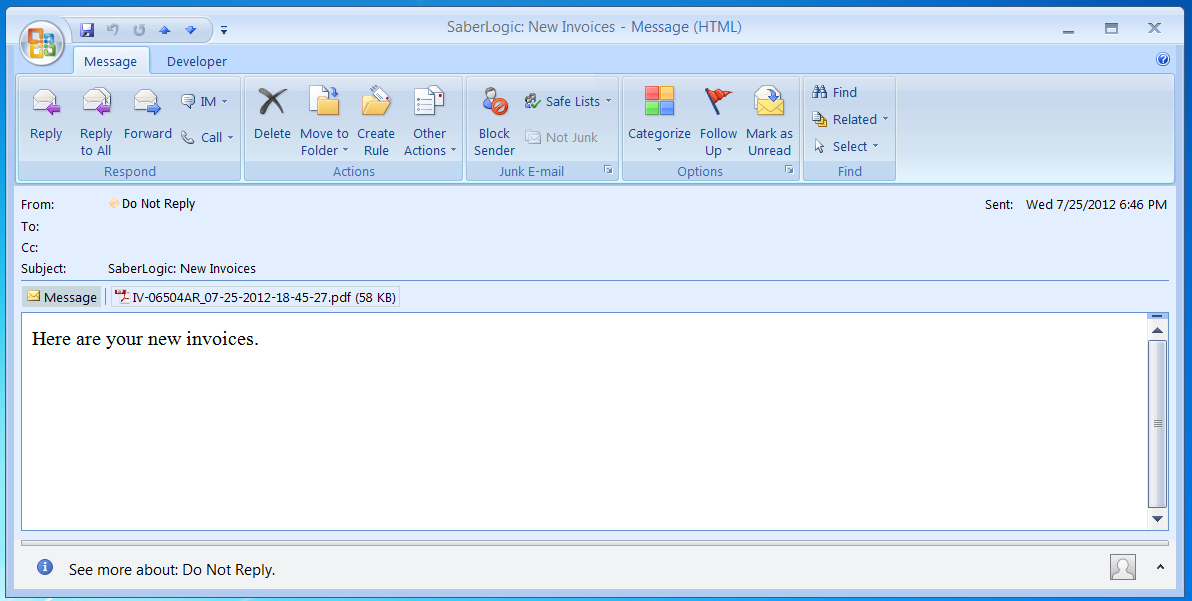
- An e-mail has been constructed which is addressed to the e-mail list from the pre-processing UI panel.
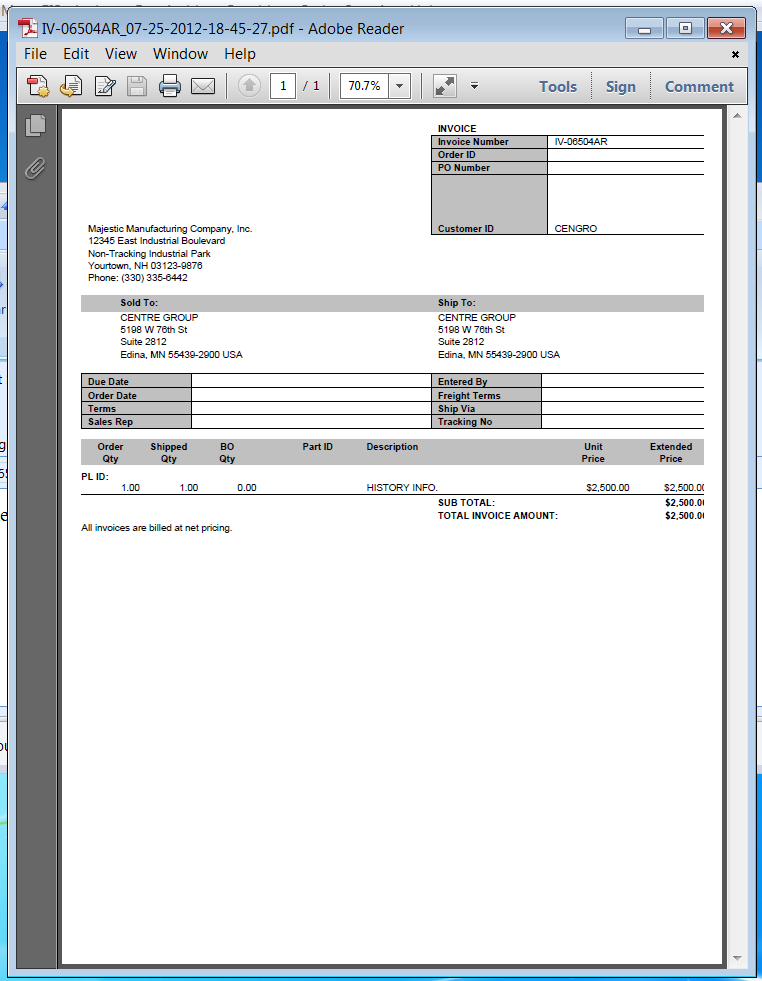
- Copies of the previously unprocessed invoices will be attached to the e-mail.
Controlling Entries in the Grid
There are instances where you might not want to ever publish invoices for a given customer. The way the solution is structured these invoices would continue to populate on the UI panel every time you initiated the process. To permit permanent removal of a set of invoices from appearing you have the option to click on the “Accept” box for those entries and then invoking the “Remove Invoices” process. The custom UD table is updated so that the selected entries will not appear again in the future.
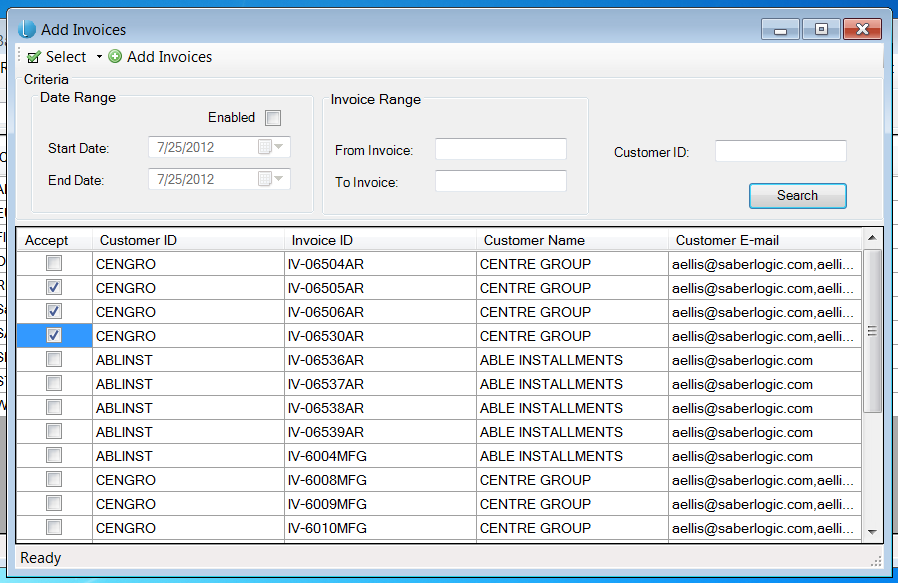
Likewise you may want to add a set of invoices to the processing list which aren’t currently being pulled in automatically. In most instances this would be previously processed invoices which need to be re-sent for some reason.
You’ll note that there are numerous search filters available to assist in the process of selecting and aggregating together the invoices which you’d like to add to the list of publishable invoices. By checking the “Accept” checkbox in this UI panel you signify that you’d like to add the entry for that line. When you have completed your selections you merely invoke “Add Invoices” and the main grid then populates with a summary entry for the invoices chosen.
Providing an Account Summary
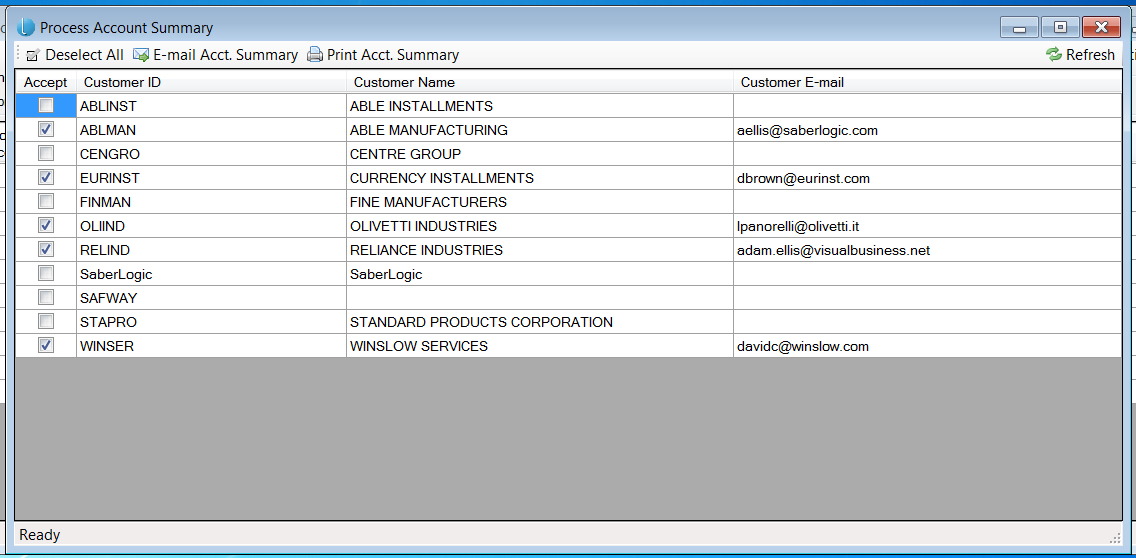
The solution also provides the ability to generate a summary report of what has been processed by invoking the “Process Account Summary”.
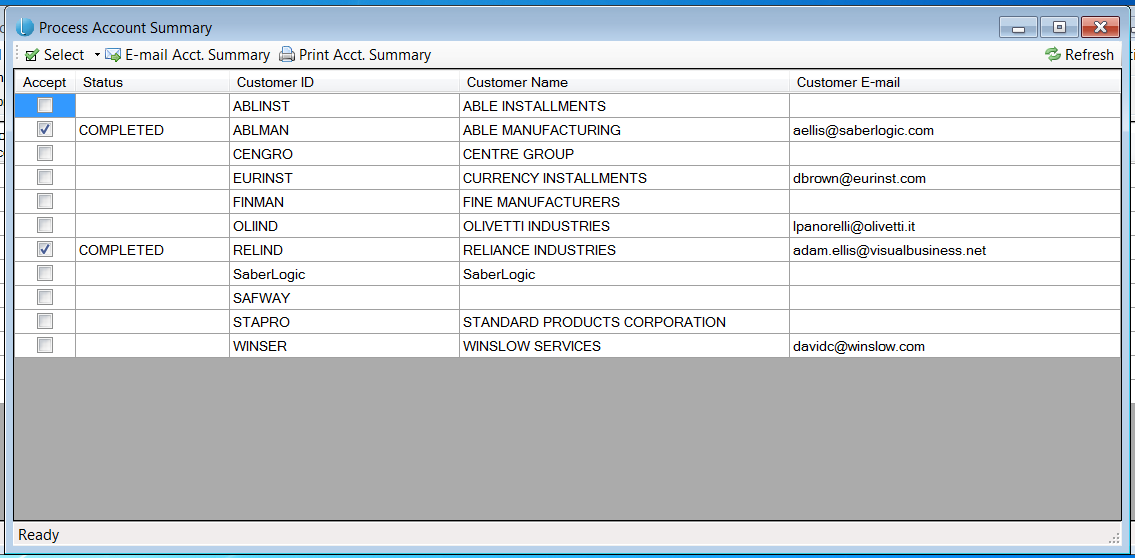
You are presented with a similar grid which populates with all of the customers which were processed in this session and those with e-mail entries are automatically “Accepted”. You have the ability to manage the list of selections as you see fit and then can initiate processing through selection of either “E-mail Acct. Summary” or “Print Acct. Summary”. Those entries with e-mail addresses would be selected together and reported using the “E-mail Acct. Summary” while those without e-mail addresses would be selected together and reported using the other.
During processing you’ll note the inclusion of the “Status” column in the UI panel with an initial “Pending” status followed up by “Completed” as each “Accepted” entry in the list completes processing. In this instance the completed entries do not disappear so that you can re-initiate generation of the summary if for some reason it didn’t generate (perhaps a printer problem).
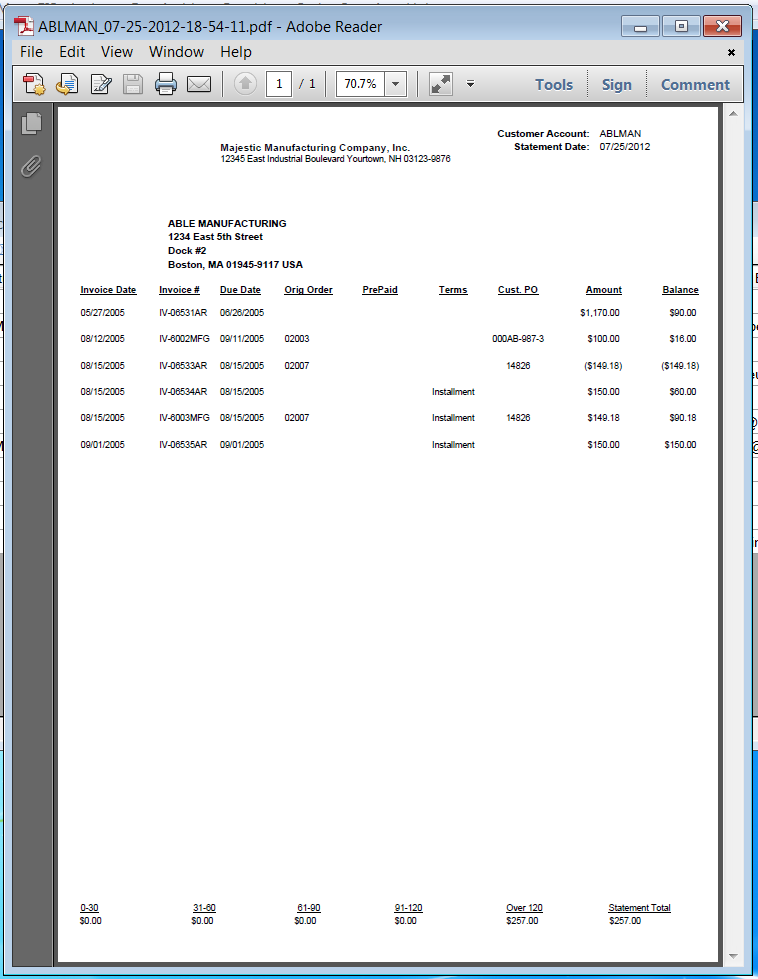
The resulting summary report would look like the following:
