ERP Compatibility
Infor® VISUAL® Manufacturing ERP / Infor® VISUAL® Enterprise ERP / Infor® 10 ERP ExpressPricing
Please contact us for pricingDisclaimer
VISUAL is a registered trademark of Infor.WIP Location Application
In the standard Infor VISUAL© Manufacturing / Infor 10 ERP Express there is a gap between the point when materials are issued to a job and when they are received as finished goods where there is no good way to track where the WIP components are in inventory (short of a work order setup that receives components into inventory and issues to a new job throughout the manufacturing process). That is why we developed the WIP Location Application. This application allows for ‘containers’ to be created and associated with inventory locations that can be moved from operation to operation.
Description
Operation
The first step in using this application will be to print a Work Order Traveller out of Visual® in Traveller format with the 'Ops Barcodes' (you will probably be doing this already):
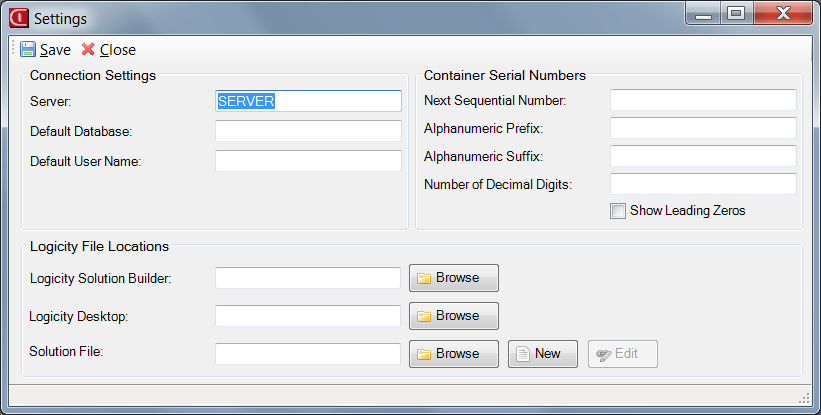
Now you will do everything you would normally do with a Work Order: issue materials and write labor tickets against the operations. The new piece will be this WIP Location Application. The first time you run the application you will be prompted to fill in the settings for the program:
- Connection Settings
- Server: this is the name or IP address of your Visual® server.
- Default Database: this is the default database you will be pointing to. As with Visual®, we allow this program to operate against whatever database you specify at login.
- Default User Name: this is the default user name that will be populated on the login screen.
- Container Serial Numbers
- Note: this section will not be enabled when this screen is launched on startup or from the login screen. You will need to open the settings from the main from in order to specify these values and should do so before scanning in your first traveler.
- Next Sequential Number: this will display the next auto-assigned container ID. If this is the first time you are running this you will probably want to set it to '1'.
- Alphanumeric Prefix: if you'd like your container IDs to be prefixed by a certain character(s) you can specify that here.
- Alphanumeric Suffix: if you'd like your container IDs to be suffixed by a certain character(s) you can specify that here.
- Number of Decimal Digits: if you choose the next option to show leading zeros, this controls how many total characters we pad out to.
- Show Loading Zeros: if this is checked we will pad out the total number of characters of the auto-assigned container IDs.
- Logicity File Locations
- Logicity Desktop: this is the path to where Logicity Desktop was installed on your computer. Logicity is installed separately from www.logicitysuite.com. This file will be in the following location by default: C:\Program Files\SaberLogic\Logicity\Logicity Desktop.exe
- Solution File: this is the path to the Logicity Solution File to be run when the 'Reports' button is clicked. The options for this file will be discussed in full detail in a separate section.
When the settings have been specified you will get a login screen:
Should you wish to bypass this login screen you can specify the connection information on the command line. Just as with the Visual® executable, our executable allows you to specify database, user name, and password as follows:
VMWIPLOC.exe -DVMFG654 -USYSADM -PSYSADM
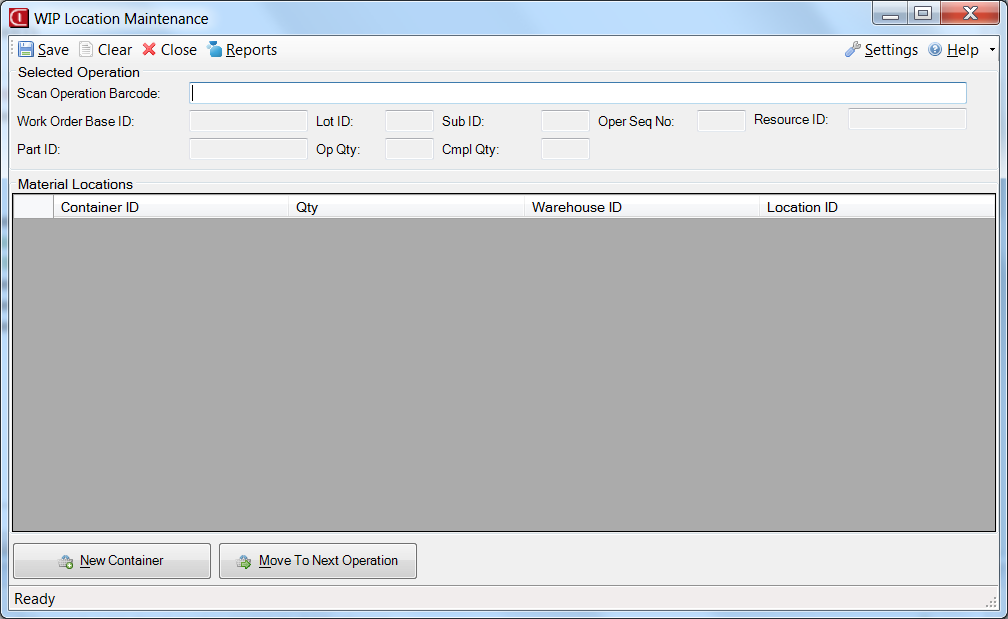
After login you will be presented with the main screen:
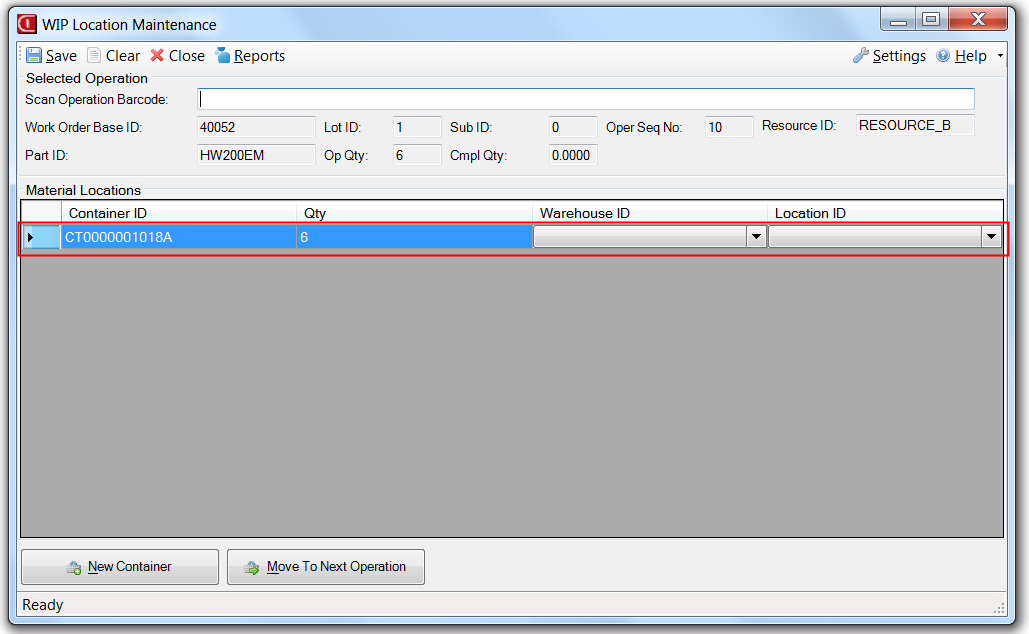
From here, assuming you have set up the container numbering under settings, you are ready to scan in your work order traveler. If this is a work order you have not yet scanned in with this application a new container will be auto-created for you:
You will notice here:
- The container ID has been auto-generated according to the details provided under Settings.
- The quantity has been defaulted to the full finished good quantity for this work order.
- The warehouse ID and location ID drop-downs are both blank.
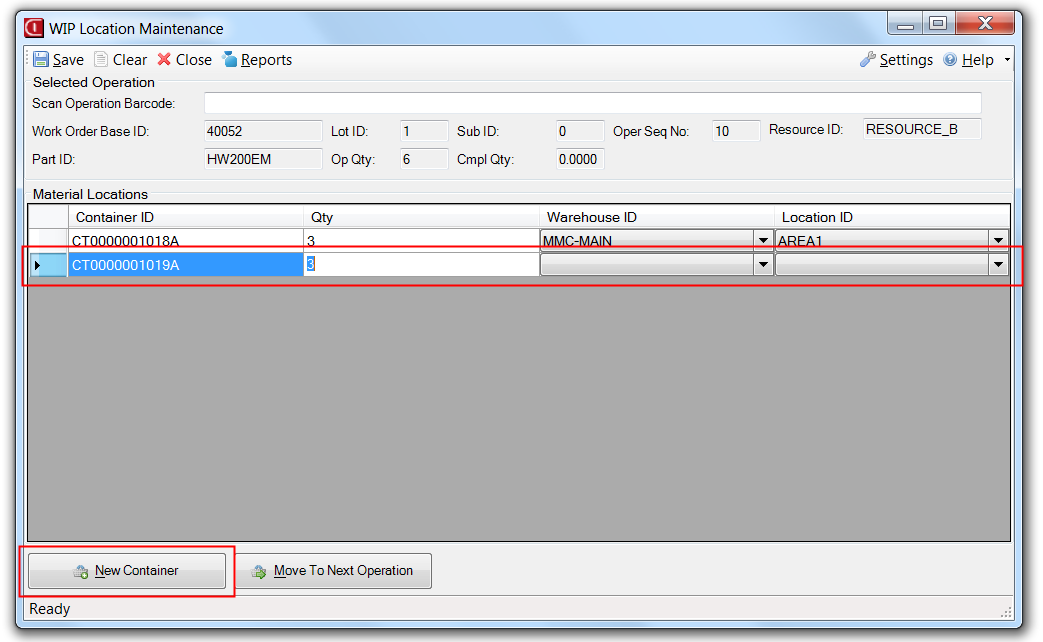
At this point you will certainly want to pick a warehouse ID and location from the drop-downs. Further, you may wish to split up this inventory among two locations. In order to do so, first edit the quantity of the existing container ID and then press the New Container button:
Here I set the first container to a quantity of 3 so when I pressed New Container it defaulted to the balance in between the existing container and the finished good quantity.
From here you will next want to click the 'Save' button in order to save any changes that have been made. You will be warned if you would try to close this screen with unsaved changes.
The next thing you might wish to do at this point is print off container labels. This can be accomplished using the built-in Logicity integration. This will be described in full detail later on, but in short you can hook up any Crystal Report to this screen and the currently selected work order base ID, lot ID, sub ID, and operation sequence number can be passed into the report.
At this point you would likely leave this work order as-is until you need to recall it at a later time to move it. As long as you have saved your changes you can simply close this screen. When you decide to move this inventory to the next operation you will need to re-launch this program, scan the barcode for the current operation, highlight the containers in the material locations grid you wish to move, and press the 'Move To Next Operation' button. If a next operation is available, the inventory will move to that next operation. If this is the last operation we will mark our container with a status of 'C' for closed and it will no longer show up on any screens.
