Hyper-rapid Mobile App Deployment for Epicor ERP
 Today I am going to show how to build mobile applications for Epicor ERP quickly using Ionic Framework for the front-end and Bezlio Remote Data Broker (BRDB) for the ERP communications. Then I will show how to convert the application quickly to run against a different ERP system, in this case, Infor VISUAL ERP.
Developing the Data Communication with the ERP
First, we are going to build the back-end communication and test that we’re getting the data that we need for our mobile application. BRDB ensures that the data is available simply with an Internet connection, no need for firewall changes, direct communication or anything like that. BRDB uses a secure push-based technology on the Microsoft Azure cloud to simplify application creation, testing, and deployment.
Since we are only going to read data in this example, I’m going to use the Microsoft SQL Server plugin to query the database directly. We store all of the connection information and queries locally protecting your server from running unwarranted queries. So with the service running I’m going to go into my application directory and go into the Plugins folder:
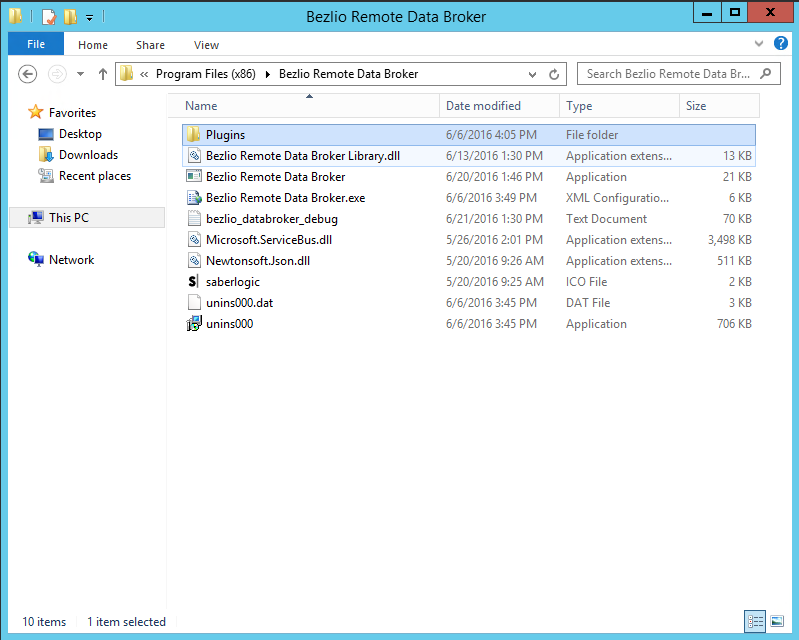
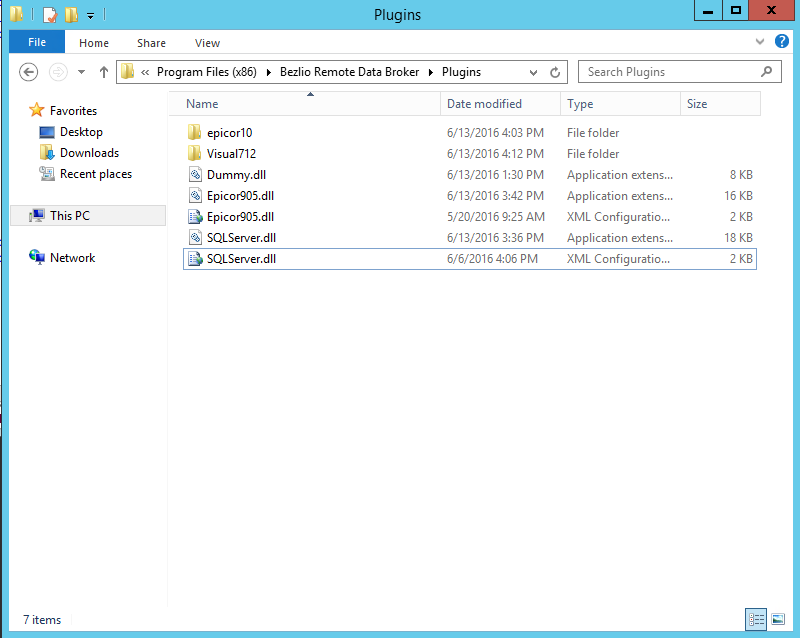
In here I have three plugins installed, a dummy plugin for simple communication testing, an Epicor905 plugin if I wanted to use the Epicor 9 business objects directly (others are available as well), and an SQL Server plugin.
The config file for the SQL Plugin has two important settings, the sqlFileLocations where we are storing our SQL files on the server and the connections which control the authentication to the SQL Server itself. These are my settings:
<setting name="sqlFileLocations" serializeAs="String">
  <value>
    [
    {
    'locationName': 'visual712',
    'locationPath': 'C:\\Program Files (x86)\\Bezlio Remote Data Broker\\Plugins\\Visual712\\'
    },
			 {
    'locationName': 'epicor10',
    'locationPath': 'C:\\Program Files (x86)\\Bezlio Remote Data Broker\\Plugins\\epicor10\\'
     }
     ]
    </value>
   </setting>
   <setting name="connections" serializeAs="String">
    <value>
     [
     {
     'connectionName': 'Visual712',
     'serverAddress': 'myserver',
     'databaseName': 'myVisualdb',
     'userName': 'myuser',
     'password': 'mypassword'
     },
			{
     'connectionName': 'epicor10',
     'serverAddress': 'myserver',
     'databaseName': 'myEpicorDB',
     'userName': 'myuser',
     'password': 'mypassword'
     }
     ]
    </value>
   </setting>
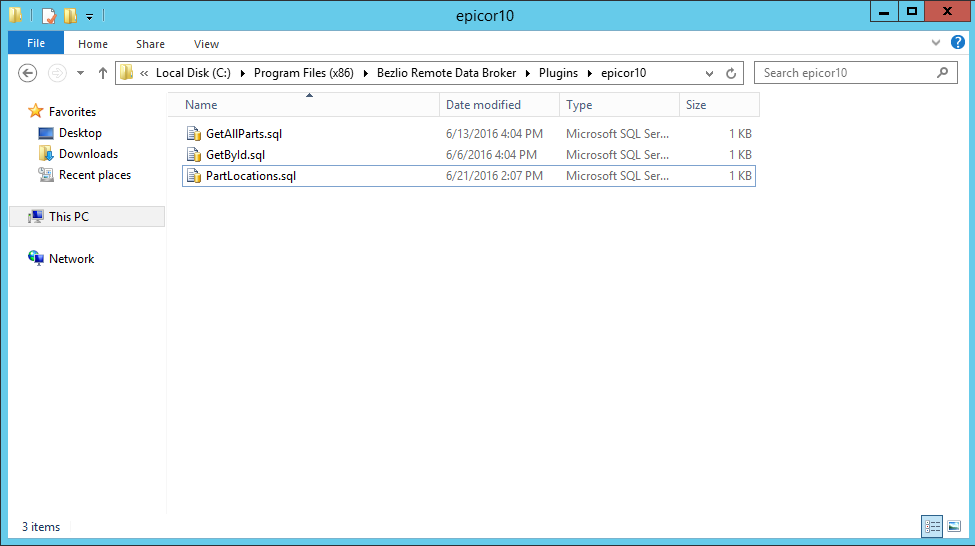
With the SQL Server configuration, I can build out my SQL files in the correct folder locations. I’m going to save this query as PartLocations.sql in the epicor10 location path (in my example that is C:\Program Files (x86)\Bezlio Remote Data Broker\Plugins\epicor10).
I start by writing a simple query to get the part location information:
SELECT
	Erp.Part.PartNum as partNum,
	Erp.Part.PartDescription as partDescription,
	Erp.PartBin.WarehouseCode as warehouse,
	Erp.PartBin.BinNum as location,
	Erp.PartBin.OnhandQty as qtyOnHand
FROM
	Erp.Part
INNER JOIN
	Erp.PartBin on Erp.Part.Company = Erp.PartBin.Company AND
	Erp.Part.PartNum = Erp.PartBin.PartNum
WHERE
	Erp.Part.PartNum = '00C1'
Which gives me the results that I needed. Now I need to make the query dynamic so that I can pass a part into it. The syntax for that is to use curly braces. So now my query looks like this:
SELECT
	Erp.Part.PartNum as partNum,
	Erp.Part.PartDescription as partDescription,
	Erp.PartBin.WarehouseCode as warehouse,
	Erp.PartBin.BinNum as location,
	Erp.PartBin.OnhandQty as qtyOnHand
FROM
	Erp.Part
INNER JOIN
	Erp.PartBin on Erp.Part.Company = Erp.PartBin.Company AND
	Erp.Part.PartNum = Erp.PartBin.PartNum
WHERE
	Erp.Part.PartNum = '{PART_ID}'
Here it is saved in the folder:
SELECT
	PART_LOCATION.PART_ID as partNum
	, PART.DESCRIPTION as partDescription
	, PART_LOCATION.WAREHOUSE_ID as warehouse
	, PART_LOCATION.LOCATION_ID as location
	, PART_LOCATION.QTY as qtyOnHand
FROM
	PART_LOCATION
INNER JOIN
	PART ON PART.ID = PART_LOCATION.PART_ID
WHERE
	PART.ID = '{PART_ID}'
Now I’m going to test out the communication to make sure I’m getting the results. I’m going to use a RESTful tester called Postman which runs in Chrome to ensure that I’m getting the expected results.

I am using the bezlioapi site hosted on Azure, and I’m requesting from my server to execute the SQLServer plugin, and run the ExecuteQuery method (this is just how you run a query remotely). In the headers, I am giving it an authorization token which validates who I am and my security to the server, and I’m passing a compress flag to compress the results (making it quicker). I’m using a POST method to send data to the server, and the body I’m sending:
{
	"Context": "epicor10",
	"Connection": "epicor10",
	"QueryName": "PartLocations",
	"Parameters": [{
		"Key": "PART_ID",
		"Value": "00C1"
	}]
}
The context tells the server what sqlFileLocation to look for the query; the connection tells the server what authentication to use, the QueryName is the name of the SQL file we created, and the parameters replace the {PART_ID} with the value. We can see that it is returning the data that we needed.
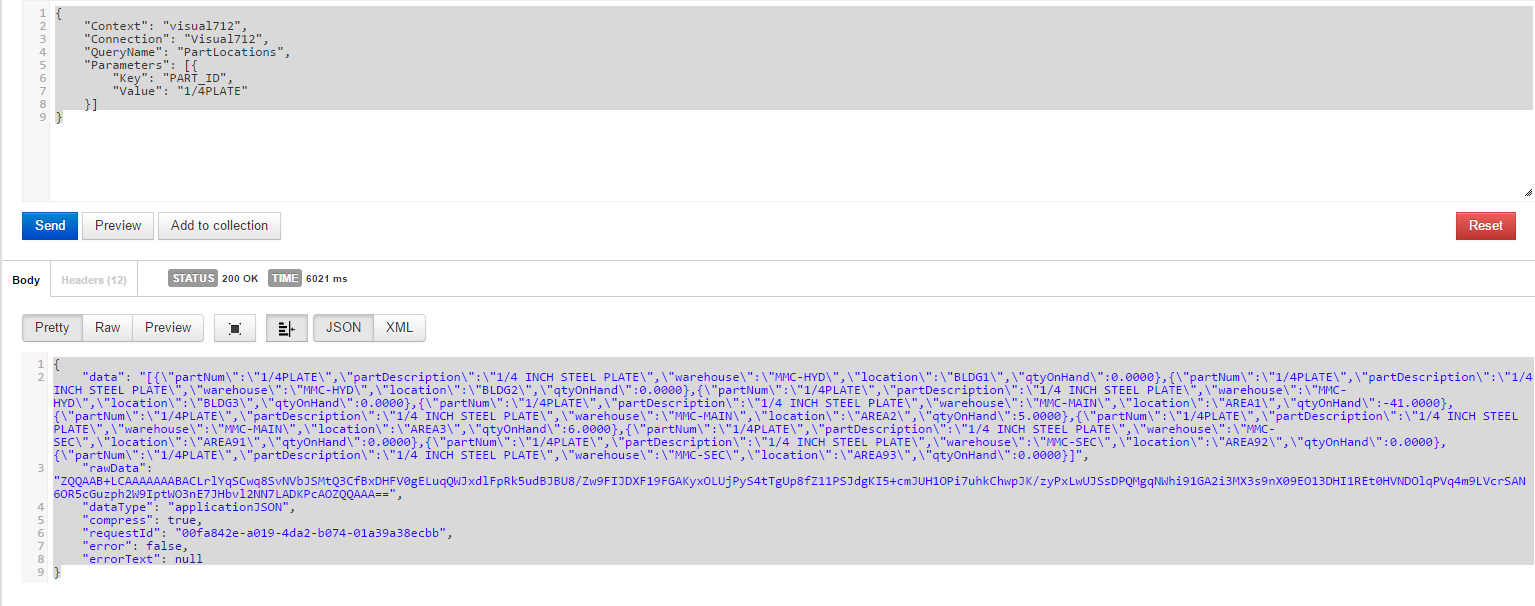
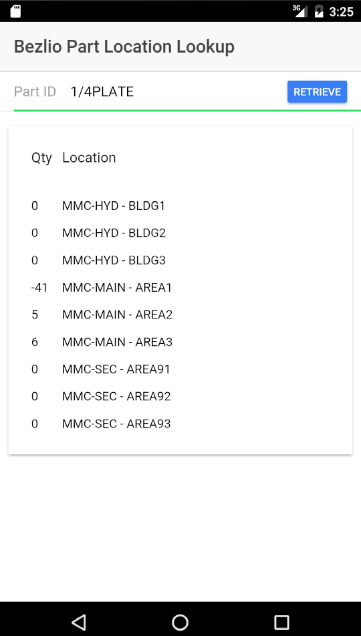
By just updating the body to the following:
{
	"Context": "visual712",
	"Connection": "Visual712",
	"QueryName": "PartLocations",
	"Parameters": [{
		"Key": "PART_ID",
		"Value": "1/4PLATE"
	}]
}
I get the data from VISUAL ERP instead.
Front-end Development Using the Ionic Framework
The backend communication component is now complete. Now we move onto the front-end. In this case, we are using Ionic 2 which is a mobile application building framework built on top of Apache Cordova. You can read more about it on their website http://ionicframework.com/
After installing the framework I’m going to build out a base application I do by entering the following into a command line:
ionic start demo blank --v2 --ts
ionic is the command line application, start tells it we’re building a new application, demo is the name of the application we’re building, v2 tells it we want to use version 2 (build on Angular 2), and ts tells is that we want to use typescript as our language.
Once it completes, we are going to tell Ionic that we want to add a data service to hook it up to Bezlio Remote Data Broker. In our command-line we will go into the demo folder that was just created and type:
ionic g provider bezlio
I’m going to use the Atom text editor for my coding, you can use whatever text editor you prefer.
In the Ionic structure, the app folder is where our application code is going to live. In that folder now we have pages which are the actual presentation layer, providers where we’re going to get our data, theme which is used for theming, and app.ts which will bring it all together. Ionic has great documentation on how each of these fit together.
For our purposes, I’m just going to edit the home.html file for our presentation layer.
I’m going to start with this:
<ion-navbar *navbar>
  <ion-title>
    Bezlio Part Location Lookup
  </ion-title>
</ion-navbar>

<ion-content class="home">
  <ion-list>
    <ion-item>
      <ion-label>Part ID</ion-label>
      <ion-input type="text"></ion-input>
      <button item-right>Retrieve</button>
    </ion-item>
  </ion-list>
  <ion-card>
    <ion-card-header>
      <ion-grid>
        <ion-row>
          <ion-col width-10>Qty</ion-col>
          <ion-col width-90>Location</ion-col>
        </ion-row>
      </ion-grid>
    </ion-card-header>
    <ion-card-content>
      <ion-grid>
        <ion-row>
          <ion-col width-10>1</ion-col>
          <ion-col width-90>warehouse - location</ion-col>
        </ion-row>
      </ion-grid>
    </ion-card-content>
</ion-card>
</ion-content>
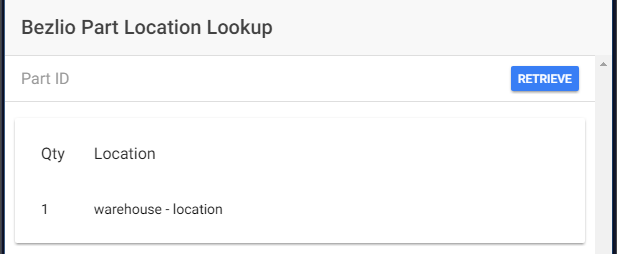
You can read about the components in the Ionic documentation, but essentially I created a title, an input for the part id, and a grid for displaying the results. You can test your code at any time by typing ionic serve in your application directory which will launch the application in a web browser, and this is what I ended up with:
Everything is static, so now we just need to hook it up to Bezlio Remote Data Broker, we are going to do that in the new provider we created. In the providers directory, under bezlio, we are going to edit the bezlio.ts file. I’m going to modify the load method to access Bezlio instead. First, I am going to add a partId parameter to the load method:
load(partId: string) {
Next, I am going to add a string which is the body we used in our Postman test. Note that I’m replacing {value} with the part id passed into the method:
      let body: string = `{
            "Context": "epicor10",
            "Connection": "epicor10",
            "QueryName": "PartLocations",
            "Parameters": [{
              "Key": "PART_ID",
              "Value": "{value}"
            }]
          }`.replace("{value}", partId);
Then I am going to add the authkey headers and add that to the request options:
      let headers = new Headers({'authkey': 'myauthkey'});
      let options = new RequestOptions({ headers: headers });
Finally, I am going to change from http.get to http.post and update the call options:
this.http.post('http://bezlioserver/bellis-vm2/SQLServer/ExecuteQuery', body, options)
So that my final code looks like this, most of which was automatically generated:
import { Injectable } from '@angular/core';
import { Http, Headers, RequestOptions } from '@angular/http';
import 'rxjs/add/operator/map';

@Injectable()
export class Bezlio {
  data: any;

  constructor(private http: Http) {
    this.data = null;
  }

  load(partId: string) {
    if (this.data) {
      // already loaded data
      return Promise.resolve(this.data);
    }

    return new Promise(resolve => {
      let body: string = `{
            "Context": "epicor10",
            "Connection": "epicor10",
            "QueryName": "PartLocations",
            "Parameters": [{
              "Key": "PART_ID",
              "Value": "{value}"
            }]
          }`.replace("{value}", partId);

      let headers = new Headers({'authkey': 'myauthkey'});
      headers.append('compress', 'true');
      let options = new RequestOptions({ headers: headers });

      this.http.post('http://bezlioserver/bellis-vm2/SQLServer/ExecuteQuery', body, options)
        .map(res => res.json())
        .subscribe(data => {
          this.data = data;
          resolve(this.data);
        });
    });
  }
}
We are going to start by editing our app.ts to tell it about our new bezlio provider. At the top we will add:
import {Bezlio} from './providers/bezlio/bezlio';
Which tells Ionic about our new provider, and we are going to update the ionicBootstrap to:
ionicBootstrap(MyApp, [Bezlio]);
Telling Ionic that we plan to use that provider. My finished app.ts is now:
import {Component} from '@angular/core';
import {Platform, ionicBootstrap} from 'ionic-angular';
import {StatusBar} from 'ionic-native';
import {HomePage} from './pages/home/home';
import {Bezlio} from './providers/bezlio/bezlio';


@Component({
  template: ''
})
export class MyApp {
  rootPage: any = HomePage;

  constructor(platform: Platform) {
    platform.ready().then(() => {
      // Okay, so the platform is ready and our plugins are available.
      // Here you can do any higher level native things you might need.
      StatusBar.styleDefault();
    });
  }
}

ionicBootstrap(MyApp, [Bezlio]);
Now we need to edit our home.ts under our pages directory, to create a method to call when we click the retrieve button. First, I need to import our bezlio provider:
import {Bezlio} from '../../providers/bezlio/bezlio';
Then I need to update our constructor (what is called when the page is created) to use the Bezlio service:
constructor(private _navController: NavController, private bezlioService: Bezlio) {
Then in the HomePage class I’m going to create a myResults variable, and a partId string variable that we will use on our page, and create a clicked function which will use the bezlioService to retrieve the data:
  private myResults = [];
  private partId :string = "";

  clicked(){
    this.bezlioService.load(this.partId).then((data) => {
        if(data){
            this.myResults = JSON.parse(data.data);
        }

    });
  }
So the final code for the home.ts is:
import {Component} from "@angular/core";
import {NavController} from 'ionic-angular';
import {Bezlio} from '../../providers/bezlio/bezlio';

@Component({
  templateUrl: 'build/pages/home/home.html'
})
export class HomePage {
  constructor(private _navController: NavController, private bezlioService: Bezlio) {

  }
  private myResults = [];
  private partId :string = "";

  clicked(){
    this.bezlioService.load(this.partId).then((data) => {
        if(data){
            this.myResults = JSON.parse(data.data);
        }

    });
  }
}
With that completed we now re-edit the home.html to hook up the new variables and function that we created.
For the part id text input we update to the following:
<ion-input type="text" [(ngModel)]="partId"></ion-input>
Which tells Ionic to bind the value of the text box to our .ts file. The button we will update to:
<button item-right (click)="clicked()">Retrieve</button>
So that when the button is clicked it called our clicked function we created above.
Our grid we will update to:
      <ion-grid>
        <ion-row  *ngFor="#item of myResults">
          <ion-col width-10>{{item.qtyOnHand}}</ion-col>
          <ion-col width-90>{{item.warehouse}} - {{item.location}}</ion-col>
        </ion-row>
      </ion-grid>
Which tells it to add a row for each of our columns, and to display the qty on hand and the warehouse – location for each row.
With that, our application development is done!
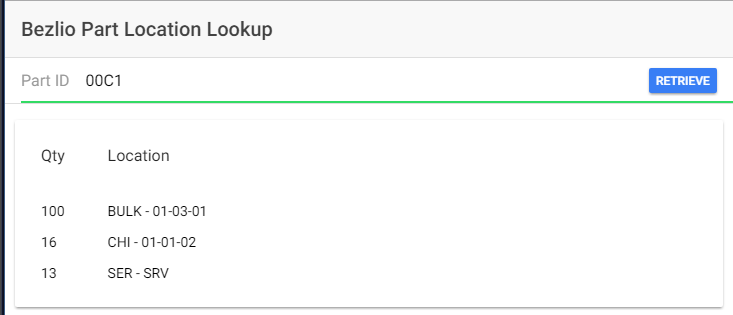
We will start by running ionic serve again and testing the functionality in the web browser. I enter my part and click retrieve and get the results set back:
Mobile App Development
Now we can compile it for mobile deployment. If you are running ionic on a Mac you can build iOS, for my testing I’m going to build it for Android. In the command-line I will run:
ionic platform add android
ionic build android
This will build the APK file.
I have Android Studio installed on my laptop so I will start my Android virtual device from the Android Virtual Device Manager then from the command line in my application directory I will go into the folder platforms/android/build/outputs/apk
I will then run:
adb install android-debug.apk
You could also plug an Android device into the computer and install the application using the same command. Once that is complete I can go into my apps and see my new demo application.
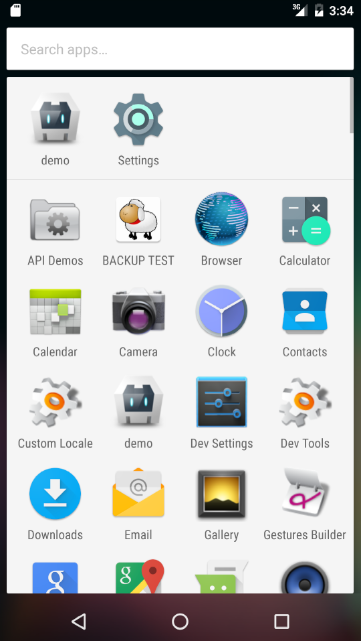
And I can launch and test it to see the compiled mobile application returning results correctly:
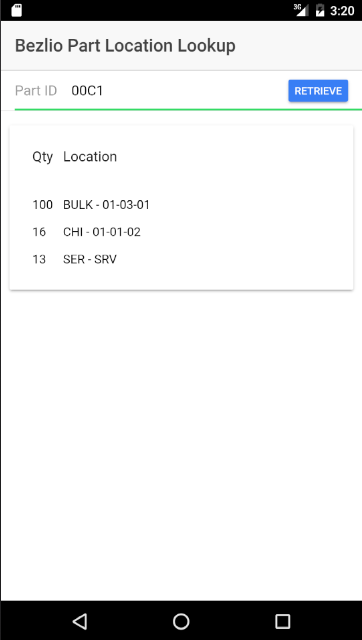
So our application is done!
Now let’s say that we want to get results from VISUAL ERP instead of from Epicor ERP. In my bezlio.ts file under providers, I can simply change the body to:
      let body: string = `{
            "Context": "visual712",
            "Connection": "Visual712",
            "QueryName": "PartLocations",
            "Parameters": [{
              "Key": "PART_ID",
              "Value": "{value}"
            }]
          }`.replace("{value}", partId);
Summary
Hopefully, you found this helpful and can see that building mobile applications for ERP systems can be done quickly and easily. With a fast enough Internet connection, you can build a full mobile application connected to your ERP in roughly 15 minutes. These applications can run from anywhere, do not need firewall ports opened, and can be cross compiled for any mobile platform.